


If you were anywhere near the internet this week, you would have seen “The Influencer Fashion Festival” masquerading as a concert in the desert. AKA Coachella. And in a sea of scantily clad social media stars and Justin Bieber mic drops, we spotted a few iconic beauty looks. Like Sabrina Carpenter’s glossy red nails. Rich, cinematic, and perfectly in sync with SC’s headline moment at Coachella, the “vintage red” manicure was everything you’d expect from a pop star in her main character era.
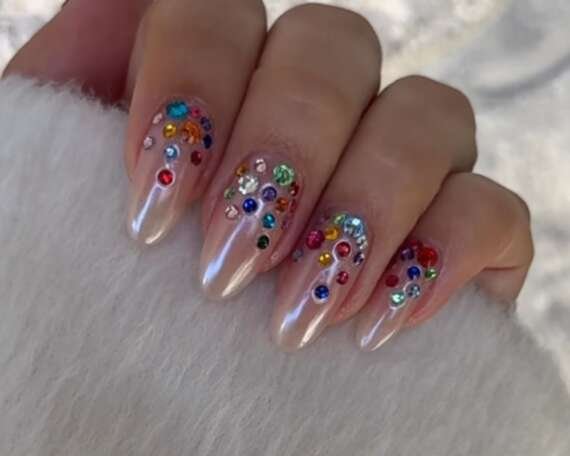
Thank you for reading this post, don't forget to subscribe!But before the stage lights, the set changes, and the high-gloss drama, there was another manicure quietly building momentum. Her pre-Coachella bedazzled glazed nails. Less polished, more playful. Less performance, more personality. And most importantly, surprisingly easy to recreate according to OPI Global Ambassador Zola Ganzorigt
While the red manicure leans into Old Hollywood glamour (deep tones, precise shaping, immaculate shine), the pre-Coachella look flips the script entirely. It starts with a sheer, almost barely-there base, layered with a glazed chrome finish and finished with scattered, multi-coloured rhinestones. The effect is light-catching, slightly undone, and effortlessly cool – like your nails just happen to sparkle in the sun. Basically, it’s festival beauty at its very best. Even if you never make it to Palm Springs.
So, if you’re ready to channel that off-duty pop star energy, here’s exactly how to get the look – without needing a backstage pass.
Step 1: Start sheer, not solid
The key to this look is the base. Skip anything opaque and opt instead for a milky, translucent shade – think soft pinks or neutral nudes that let your natural nail peek through. OPI’s softer gel shades (or anything in that “your nails but better” category) work perfectly here. Apply two thin coats, building just enough coverage to smooth the nail without masking it.
Step 2: Dial up the gloss
Next comes shine – and not just any shine. You want that almost glassy, wet-look finish that reflects light from every angle. A high-gloss top coat is essential here. This step alone gives the manicure that elevated, editorial feel, even before the chrome hits.
Step 3: Add a chrome veil
This is where the magic happens. A light dusting of chrome powder transforms the base from simple to statement. Instead of going full mirror-metal, keep it soft – more glow than glare. Focus on creating a glazed effect that shifts subtly in the light, rather than overpowering the base colour.
Step 4: Place (don’t perfect) your rhinestones
Now for the fun part. Using nail glue or a gel top coat, add small, multi-coloured rhinestones across each nail. The trick? Don’t overthink it. This isn’t about symmetry or precision – it’s about controlled chaos. Scatter them sparingly, vary the sizes slightly, and resist the urge to make every nail identical. The end result should feel playful, not polished.
Step 5: Seal (strategically)
Finish with another layer of top coat, but be careful not to dull the sparkle. Work around the rhinestones rather than over them if you want to keep that faceted shine intact.
The final look is equal parts minimal and maximal – clean, glossy nails with just enough embellishment to catch the light (and attention). It’s the kind of manicure that works just as well at a festival as it does at brunch, which is exactly why it’s gaining traction beyond the desert.


